Modularized Spectrum Analyzer
If you are constructing the SLIM version of the MSA, a better Test page
is at: Integration
and Verification Test Procedure for the MSA, Modularized Spectrum
Analyzer.
The purpose of this page is to help the MSA builder test his modules as he completes their constructions for the Original MSA. It is not necessary to test the modules independently. They can be easily tested when they are all completed and integrated together.
This Page was Started Mar. 26, 2006
Updated 4-10-2006 Revised the AtoD Module test software to rev101. Had a code error.
Updated 4-12-2006 Add Command test for 12 Bit AtoD Module
Updated 4-24-2006 Add PLL tests for LMX 2326 and LMX 2353
Updated 6-20-2006 Updated Control Board Test to Rev.103
This is the Testing page for the MSA modules. Here are other links supporting the MSA :
Main Page for MSA. Main page for the MSA.
MSA Block Diagram

Block Diagram for the 0 to 1 GHz Spectrum Analyzer
Testing the MSA Modules
The modules can be constructed and everything tested at one time. If so, no test equipment is required (assuming everything is correct). However, some builders may want to build the modules and test them independently. If this is the case, the first module to build is the Control Board. It will contain interfacing, so that the computer can command the individual modules. It will also contain all the voltage regulators needed for the other modules. As previously mentioned, I have not suggested any type of main power supply to use. For full MSA operation, the MSA requires +24v DC (appx. 10 ma), +18v DC (appx. 500 ma), and -5v DC (appx. 10 ma). Some of the modules require a voltage source(s) and computer commands. Some require voltage only. And some require neither, such as the Mixer Modules and Filter Modules. I will list the modules in an order that I would build and test. In all cases where commanding is required for testing, the following equipment is required: Home computer, printer port cable (DB25 connectors), Control Board, and an external DC power supply(s). Software is Liberty Basic version 3.01 or later. Individual software test programs are underlined.
Control Board
The control board requires only the +18v, at 10 ma., to test. If the Control Board includes an integrated AtoD Conversion circuit, I will describe it's AtoD test in the AtoD Module section. The following are diagrams for all of the Control Boards that have been designed. Any one will work fine for the MSA.
This is the original Control Board, with integrated 8 bit AtoD:
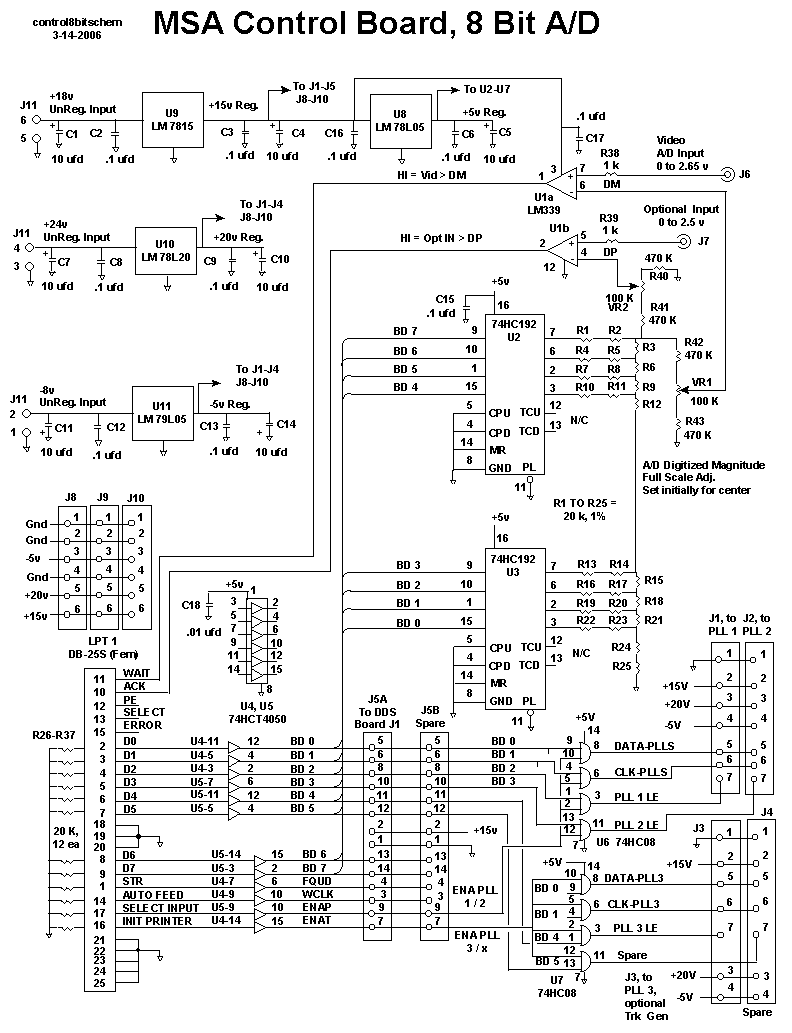
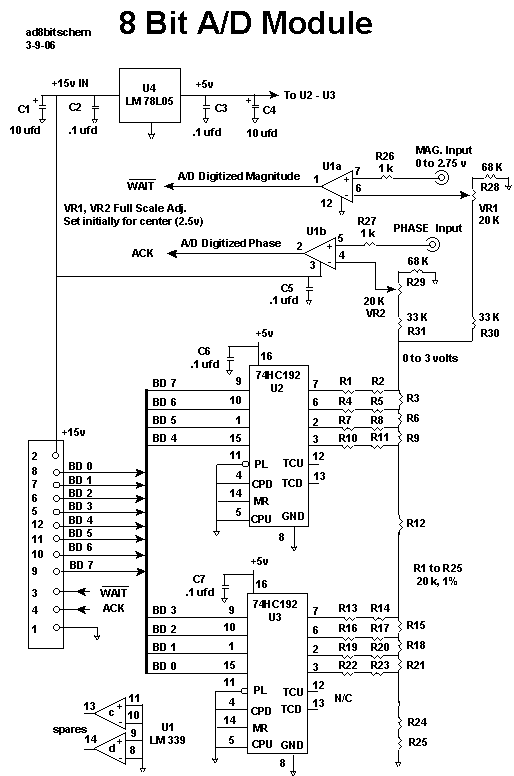
This 8 bit AtoD will give good the MSA good performance with an amplitude resolution of approxomately .3 dB.
This is the second Control Board design, with integrated 12 bit AtoD:
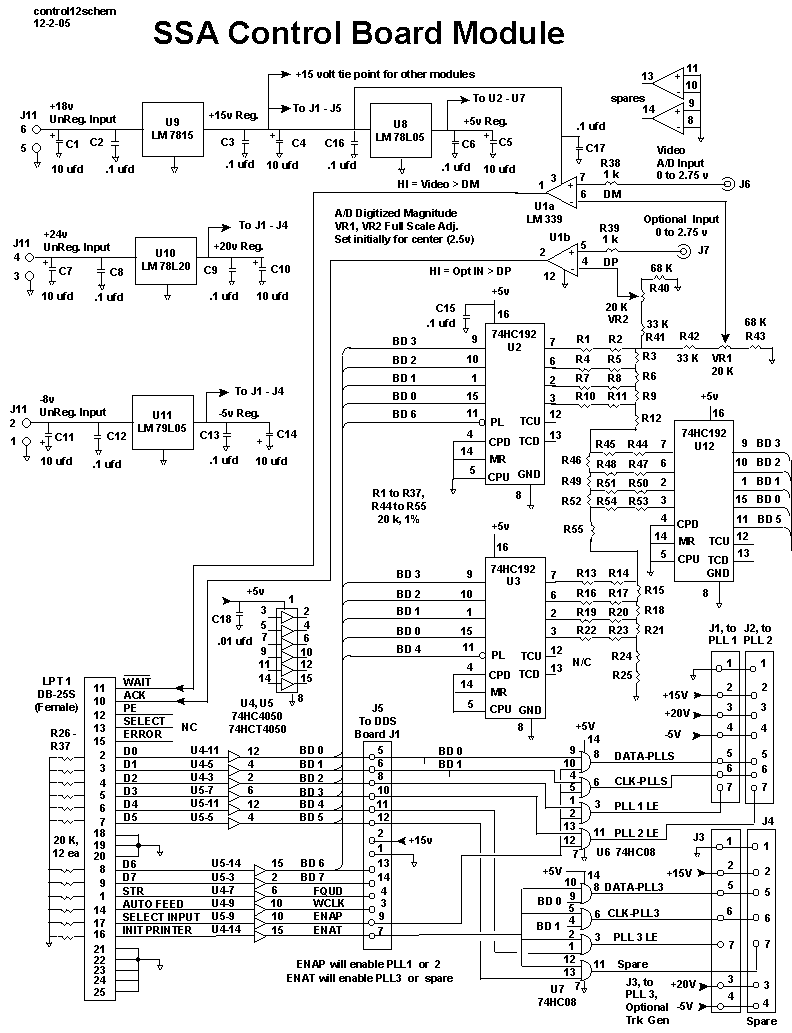
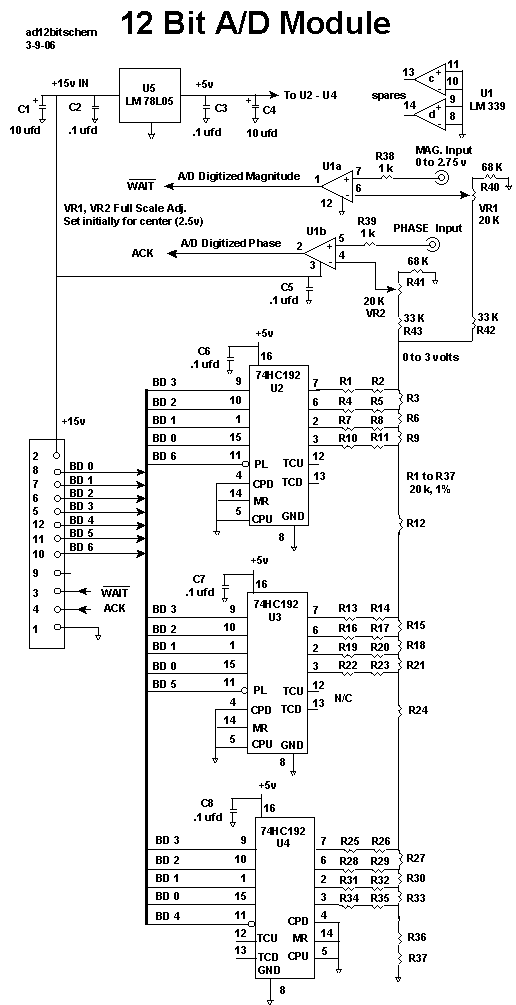
This 12 bit AtoD will give good the MSA good performance with an amplitude resolution of approxomately .1 dB.
This is the latest schematic design of the MSA Control Board, RevA :
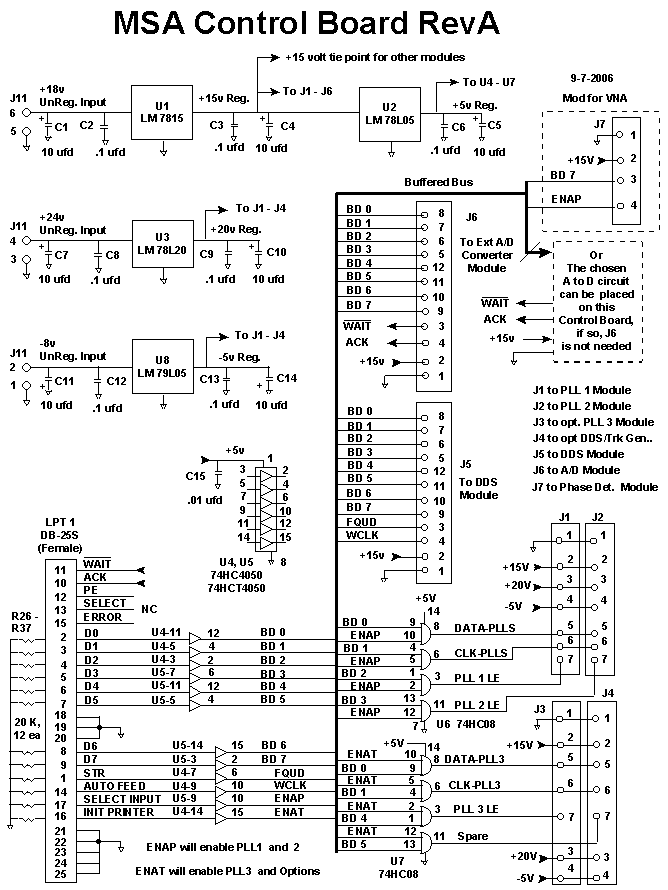
This is a more general purpose Control Board than the ones with integrated AtoD circuits. If you are not building the MSA and want just a computer interface, this is the board to build.
Updated, 6-20-06:
Test Equipment Required: DC Voltmeter
Set Up: Connect external +18v to Control Board. Measure the output of the +15 volt regulator. Measure the output of the +5 volt regulator. Connect the printer port cable from the computer to the control board. Open Liberty Basic main program, then open controltest.bas. (this software is updated to ver.103). The Code Window will open. Click on "Run" (little blue man). A window called, "Control Board Test" will open. All control lines will be set to "0" after clicking the "SEND PORT DATA" Button. Measure the following pins on the LPT 1 connector. Each should read 0v: Pins 1-9, 14, 16, and 17. All of the buffered outputs of U4 though U7 should also read 0v.
In the test window, you can change each bit independently by clicking on it's respective box. Clicking the right-hand box will cause that line to go "high", after the 'SEND PORT DATA' button or 'SEND CONTROL DATA' button is clicked. The left box will set the bit command to "0".
For example, click the box, called "Pin 1, Strobe, FQUD". The left box will change from a "0" to a "1". Click the box, called "SEND CONTROL DATA". The LPT port, pin 1 will go high. Pins 14, 16, and 17 will remain in their previous state, or go "low" if this is the first command after beginning the program. The "high" voltage measured on the LPT connector will be a high TTL level, somewhere between 2 volts and 5 volts. The voltage measured after the Control Board buffer (U4pin6) will measure 5 volts (CMOS high). Each of the bits can be tested in this manner.
The Status Bits will be read when the "CAPTURE STATUS" button is pressed. If the AtoD circuit is integrated onto the Control Board, the WAIT and ACK bits may be indeterminate (0 or 1). The PE, SEL, and ERR bits should read "1". With the LPT cable disconnected from the Control Board, all status bits will read "1". You can then short any of the 5 status bits to ground and the status (when clicked) will read (0) on the bit that was grounded.
If these controls do not work, it indicates that your computer LPT 1 is not set up for the correct COM port within the computer. I have extensively tested this piece of software, and it seems to work quite well, even without a Control Board.
AtoD Module
The AtoD circuitry can be integrated onto the Control Board or in a seperate module. The testing will be same, with the exception that the external module regulator should be tested for proper +5 volt output. The basic test is to input a voltage (nominally, 2.5 volts DC) into the AtoD magnitude input (and phase input if there), and command the AtoD for conversion. The following are the schematic designs for external AtoD Modules.
8 Bit A to D Converter Module:
12 Bit A to D Converter :
16 Bit Serial A to D Converter :

Extra Equipment Required: DC Voltmeter, variable voltage reference (or any voltage between 0 and +5 volts, to be digitized).
Set Up: Connect AtoD module cable to Control Board J6, if external AtoD module is used. Connect external +18v to Control Board. Measure the output of the AtoD's +5 volt regulator. Connect the printer port cable from the computer to the control board. Open Liberty Basic main program, then open atodtest.bas. (latest is rev.101). The Code Window will open. Change the values of the global variables, magadconv =, and phaadconv =. Input a value of 8, 12, or 16 depending on the type AtoD you have installed in each position.
Apply +2.5 volts to the Magnitude input of the AtoD. Apply +2.5 volts to the Phase input of the AtoD, if installed. You can tie the two inputs together and apply a single voltage to both. Click on "Run" (little blue man). A small window "Analog to Digital Converter Test" will open and begin "RUNNING", as seen in the box above the "RESTART" button. The top box "Magnitude Data" will read the decimal equivalent of the magnitude AtoD output. The second box "Phase Data" will read the decimal equivalent of the phase AtoD output. The value will be dependent on several factors: Type of AtoD, Voltage level at input to AtoD, and where the Adjustment pots are set (VR1, VR2). You should be able to adjust these pots and change the output value(s) in the window. You must stop the program before "exiting" the window. Just press any key on the computer keyboard.
For the 8 Bit AtoD and +2.5V input you should be able to adjust VR, about mid range, to get a value of 250. 255 is the maximum bit value of an 8 bit AtoD.
For the 12 Bit AtoD and +2.5V input you should be able to adjust VR, about mid range, to get a value of 4090. 4095 is the maximum bit value of a 12 bit AtoD.
For the 16 Bit AtoD and +2.5V input you should be able to adjust VR, about mid range, to get a value of 65000. 65535 is the maximum bit value of a 16 bit AtoD.
April 12, 2006 Add the following test software: commandAtoD12.bas . This test will open up a little window so that you can input a code, in bit values from 0 to 4095. It will command the 12 Bit AtoD's ladder latches, and retain the data in a static condition. This way, the builder can troubleshoot any problem on his 12 Bit AtoD board.
Log Detector Module
The Log Det Module does not require any direct commands from the computer, and it can be tested with only a voltmeter. If tested in conjuction with the AtoD Module, no voltmeter is needed.
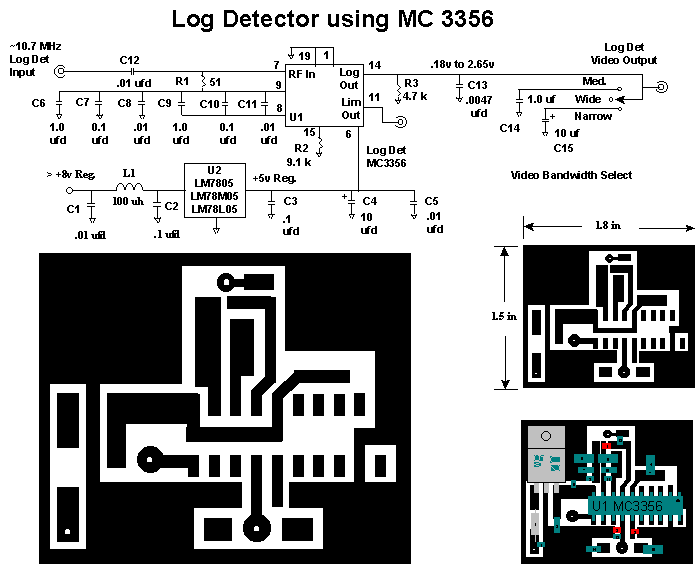
This is a Log Det circuit using the MC3356 IC. It is my original design and works quite well. However, the MC3356 is not readily available.
Log Detector using MC3356 :
The following are Log Detector circuits designs utilizing two Log Det IC's from Analog Devices.
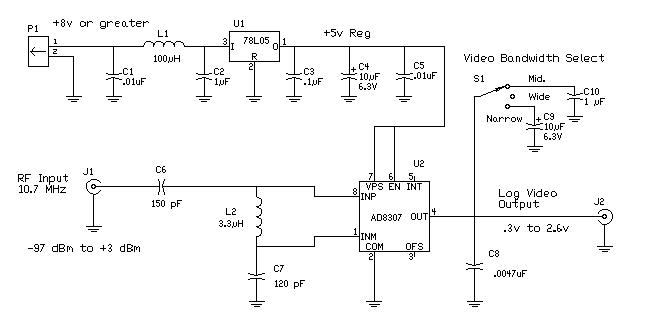
Log Detector using AD8307 :
Log Detector using AD8306 :
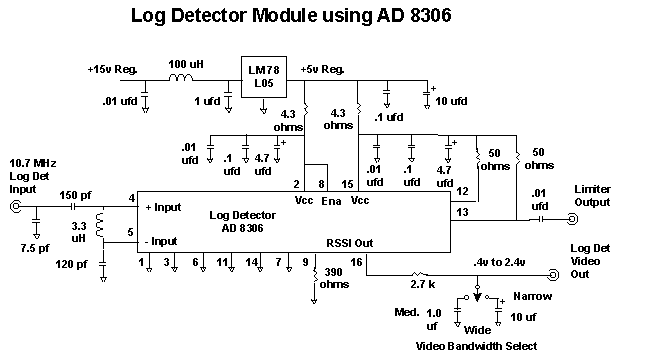
The AD8306 has similar characteristics as the AD8307, and it has a limited RF output. The limiter is not used in the MSA, but I chose this device so that I could use the MSA for experimenting as a Vector Network Analyzer.
To determine if the Log Det is wired correctly and is operational, just apply power to the module and measure the DC output of the Log Det. With no signal input, it should read from 200 to 300 mv. Touch your finger to the input pin (added ambient noise), and DC Video output should increase.
For full integrated testing, connect the Log Det to the AtoD Converter, and the AtoD Converter to the Control Board. Open and Run atodtest.bas. The Bit Value in the "Analog to Digital Converter Test" Window will indicate the output of the Log Detector. The actual value will depend on several factors. They are, type of Log Detector, type of AtoD, Voltage level at input to AtoD (Log Det out), and where the Adjustment pots are set (VR1, VR2 on AtoD Module).
With a known RF signal on the input, the Log Det can be characterized. You need an RF source (CW) at the frequency the Log Det is going to be used at, (Final I.F. frequency of the MSA), nominally 10.7 MHz. The power level should be adjustable from +10 dBm to -100 dBm. A 50 ohm selectable attenuator is optimum and should be placed directly on the input to the Log Det. This will minimize input noise when the RF signal is very low. Connect a voltmeter to the output of the Log Det. Apply power to Module, but don't apply any RF to the attenuator. Set attenuator to about 50 dB of attenuation. Measure the Log Det output, and write it down. This is the noise floor of the Log Det. Apply -10 dBm to the Log Det. Write down it's output measurement. Increase the attenuation by 10 dB for an input signal to the Log Det to be -20 dBm. Write down it's output measurement. Continue this process until the Log Det output becomes equal to the noise floor. This is the minimum RF input the Log Det can measure (max sensitivity). Now, input -10 dBm again and decrease the attenuation in steps, to increase the RF input to the Log Det. You should be able to find the compression point of the Log Detector. The actual level will depend on the actual circuit design of the Log Detector. For the MC3356, the level is about 0 dBm. For the AD8306/8307, it is about +10 dBm. In any case, this is the maximum input to the Log Detector, and the only measurement that is important in the design and calibration of the MSA. It is important to say that the Log Detectors maintain their best accuracy when operated in the range of 10 dB below compression, and 10 db above the maximum sensitiviy. For the MC3356, this range is about -10 dBm down to -80 dBm.
If you are integrating the Log Detector, AtoD and Control Board at this time, you can calibrate and set the Adjustment pots in the AtoD Module. With this maximum RF input to the Log Det, adjust VR1 (or VR2) for maximum bit value being shown in the "Analog to Digital Converter Test" Window. For an 8 Bit, adjust for 254 or 255. For a 12 bit, adjust for 4094 or 4095. For the 16 bit, adjust for 65534 or 65535. These are the maximum AtoD values, so care should be taken in adjustment. Once the max value is reached (255, 4095, or 65535) further adjustment will not change the bit value. I suggest adjusting the pot(s) for 1 bit less than max value, when the maximum RF input is input to the Log Det. Write down this RF power level and call it "maxpower". Write down the bit value as "maxbits". These will be used later as a calibration value. Decrease the RF input signal into the Log Det by increasing the attenuator by 10 dB. Write down the bit value displayed in the Window as the value for "minus10bits". Increase the attenuator another 10 dB and write down the bit value displayed in the Window as the value for "minus20bits". Repeat these steps for all steps down to "minus130bits". It is likely that the bit values will duplicate from -100 dB to -130 dB. If so, just use the same bit values for the duplicating steps.
Master Oscillator Module
The Master Oscillator cannot be very well evaluated without a frequency counter and oscilloscope. If you don't have the test equipment, don't worry. Just test and verify that the voltage regulator is working properly. The output of the Master Oscillator can be verified when it is connected while testing the next module, the DDS Module.
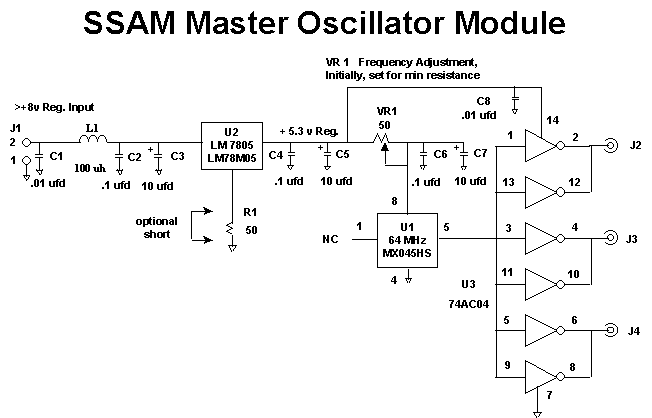
This Master Oscillator Module is designed for maximum utility. The oscillator is buffered with a 74AC04 and has 3 outputs. Each output will drive a 50 ohm load, but I suggest the load be capacitively coupled to reduce power consumption in the buffer. If any output is not used, leave it open.
The oscillator will push in frequency with a minor change of Vcc. The voltage regulator is biased with the 50 ohm resistor and its output will be approximately 5.3 volts. Construct the module with R1 in place, but with a small shorting wire across R1. Adjust VR 1 for minimum resistance and check the frequency. If you can adjust VR 1 to bring the frequency to exactly 64 MHz, leave the short on R1. If not, open the short and adjust VR1 for exact frequency. For example, one of my tests showed that the 5v reg. was outputting 5.11 volts with the short. The osc was at 64.000697 MHz. Adjusting VR 1 for 5.01 volts on the MXO oscillator gave exactly 64.000000 MHz. If the builder is not planning to add the optional Tracking Generator, the Master Oscillator Frequency does not need to be adjusted. The software will allow frequency intolerance.
I have found that when the module is totally enclosed, the frequency becomes quite stable after about 5 minutes. However, with the module open, any air currents will cause temperature changes on the MXO oscillator, and cause frequency shifts.
Note that, if the R1 is left in circuit, the tab of the voltage regulator is NOT at ground potential and must be isolated from ground.
DDS Module
DDS using AD9850 :

The DDS Module can also be tested when integrated with the Control Board and Master Oscillator Module. Only a voltmeter is required for evaluation. Power up the Control Board with the Master Oscillator Module and DDS Module connected. Verify the DDS's 5v regulator is correct. Open ddstest.bas . The code window will open and show two global variables, "ddsclock" and "ddsoutput". Change the values of these variables to your requirements. The "ddsclock" is preset to "64" (64 MHz Master Clock frequency). The "ddsoutput" is preset to ".0000001". This is 0.1 Hertz. Click on "RUN" in the code window (or little blue man). The program will run and command the DDS to output a frequency of .1 Hz. Measure the voltage on the DDS Module at R4 or R5. This point is in between the output of the DDS chip and the output coupling capacitor. The voltmeter will read a changing voltage of 0 volts to about .5 volts, every 10 seconds. This will verify the output of the DDS module and will also verify that the Master Oscillator is running.
Change "ddsoutput" value to .000060 (60 Hz). Measure the DDS Module output connector(s) with the voltmeter's AC function. You should measure about 185 millivolts rms.
VCO Module
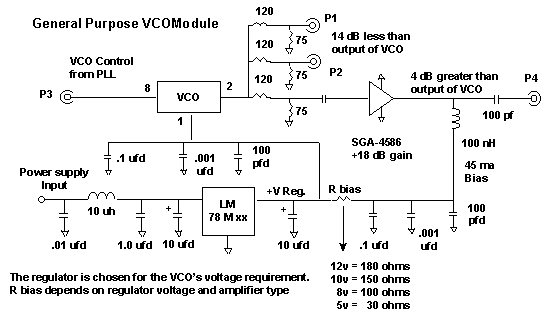
The VCO Module is not easily tested independently. Most home builders do not have high frequency test equipment. Therefore, I propose the builder construct both the VCO and PLL Module and test them together. The VCO Module requires a power source of +15v at 80 ma.
PLL Module
The PLL Modules come in several configurations, but all can be tested in the same manner and with the same software.
PLL 1 style, using LMX 2326 or ADF 4112: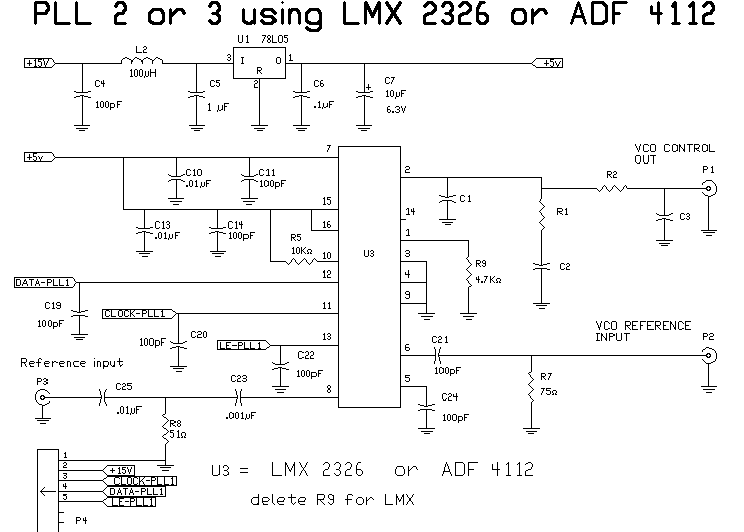
The PLL 1 style Module requires 3 voltage sources: +20 v at 5 ma, +15 v at 20 ma, and -5 v at 5 ma.
PLL 2 / 3 style, using LMX 2326 or ADF 4112:
The PLL 2 type requires only the +15v source. These designs can be modified by replacing the PLL IC's with other types. These modules have also been built with the LMX2325, LMX2350, and LMX2353. All perform very well.
VCO/PLL Module Combination
Modules required for testing: Control Board, Master Oscillator, VCO, and PLL. The only test equipment required is the voltmeter to verify operation. Connect the VCO Module's Reference Output (P1 or P2) to the PLL Module's VCO Reference Input (P2). Connect the PLL Module's Control Voltage Output (P1) to the VCO Module's Control Input (P3). Connect the output of the Master Oscillator (or other frequency source) to the PLL Module's Reference Input (P3). Connect the PLL Module's Control (P4) to the Control Board's J1 (or J2 or J3) connector. Apply needed voltage sources to Control Board (+24v, +18v, -8v). Open Liberty Basic and then open LMX2326test.bas or LMX2353test.bas . The code window will open. Change the Global variable values for your conditions.
These PLL tests are still in progress of being written, and have not been thoroughly tested. I am posting these two software routines for a few builders who want to "tinker".
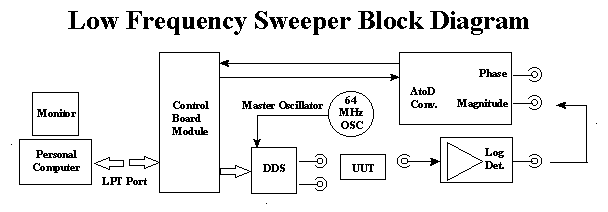
Low Frequency Sweeper, with Display
The purpose of this page is to help the MSA builder test his modules as he completes their constructions for the Original MSA. It is not necessary to test the modules independently. They can be easily tested when they are all completed and integrated together.
This Page was Started Mar. 26, 2006
Updated 4-10-2006 Revised the AtoD Module test software to rev101. Had a code error.
Updated 4-12-2006 Add Command test for 12 Bit AtoD Module
Updated 4-24-2006 Add PLL tests for LMX 2326 and LMX 2353
Updated 6-20-2006 Updated Control Board Test to Rev.103
This is the Testing page for the MSA modules. Here are other links supporting the MSA :
Main Page for MSA. Main page for the MSA.
MSA Block Diagram
Block Diagram for the 0 to 1 GHz Spectrum Analyzer
Testing the MSA Modules
The modules can be constructed and everything tested at one time. If so, no test equipment is required (assuming everything is correct). However, some builders may want to build the modules and test them independently. If this is the case, the first module to build is the Control Board. It will contain interfacing, so that the computer can command the individual modules. It will also contain all the voltage regulators needed for the other modules. As previously mentioned, I have not suggested any type of main power supply to use. For full MSA operation, the MSA requires +24v DC (appx. 10 ma), +18v DC (appx. 500 ma), and -5v DC (appx. 10 ma). Some of the modules require a voltage source(s) and computer commands. Some require voltage only. And some require neither, such as the Mixer Modules and Filter Modules. I will list the modules in an order that I would build and test. In all cases where commanding is required for testing, the following equipment is required: Home computer, printer port cable (DB25 connectors), Control Board, and an external DC power supply(s). Software is Liberty Basic version 3.01 or later. Individual software test programs are underlined.
Control Board
The control board requires only the +18v, at 10 ma., to test. If the Control Board includes an integrated AtoD Conversion circuit, I will describe it's AtoD test in the AtoD Module section. The following are diagrams for all of the Control Boards that have been designed. Any one will work fine for the MSA.
This is the original Control Board, with integrated 8 bit AtoD:
This 8 bit AtoD will give good the MSA good performance with an amplitude resolution of approxomately .3 dB.
This is the second Control Board design, with integrated 12 bit AtoD:
This 12 bit AtoD will give good the MSA good performance with an amplitude resolution of approxomately .1 dB.
This is the latest schematic design of the MSA Control Board, RevA :
This is a more general purpose Control Board than the ones with integrated AtoD circuits. If you are not building the MSA and want just a computer interface, this is the board to build.
Updated, 6-20-06:
Test Equipment Required: DC Voltmeter
Set Up: Connect external +18v to Control Board. Measure the output of the +15 volt regulator. Measure the output of the +5 volt regulator. Connect the printer port cable from the computer to the control board. Open Liberty Basic main program, then open controltest.bas. (this software is updated to ver.103). The Code Window will open. Click on "Run" (little blue man). A window called, "Control Board Test" will open. All control lines will be set to "0" after clicking the "SEND PORT DATA" Button. Measure the following pins on the LPT 1 connector. Each should read 0v: Pins 1-9, 14, 16, and 17. All of the buffered outputs of U4 though U7 should also read 0v.
In the test window, you can change each bit independently by clicking on it's respective box. Clicking the right-hand box will cause that line to go "high", after the 'SEND PORT DATA' button or 'SEND CONTROL DATA' button is clicked. The left box will set the bit command to "0".
For example, click the box, called "Pin 1, Strobe, FQUD". The left box will change from a "0" to a "1". Click the box, called "SEND CONTROL DATA". The LPT port, pin 1 will go high. Pins 14, 16, and 17 will remain in their previous state, or go "low" if this is the first command after beginning the program. The "high" voltage measured on the LPT connector will be a high TTL level, somewhere between 2 volts and 5 volts. The voltage measured after the Control Board buffer (U4pin6) will measure 5 volts (CMOS high). Each of the bits can be tested in this manner.
The Status Bits will be read when the "CAPTURE STATUS" button is pressed. If the AtoD circuit is integrated onto the Control Board, the WAIT and ACK bits may be indeterminate (0 or 1). The PE, SEL, and ERR bits should read "1". With the LPT cable disconnected from the Control Board, all status bits will read "1". You can then short any of the 5 status bits to ground and the status (when clicked) will read (0) on the bit that was grounded.
If these controls do not work, it indicates that your computer LPT 1 is not set up for the correct COM port within the computer. I have extensively tested this piece of software, and it seems to work quite well, even without a Control Board.
AtoD Module
The AtoD circuitry can be integrated onto the Control Board or in a seperate module. The testing will be same, with the exception that the external module regulator should be tested for proper +5 volt output. The basic test is to input a voltage (nominally, 2.5 volts DC) into the AtoD magnitude input (and phase input if there), and command the AtoD for conversion. The following are the schematic designs for external AtoD Modules.
8 Bit A to D Converter Module:
12 Bit A to D Converter :
16 Bit Serial A to D Converter :
Extra Equipment Required: DC Voltmeter, variable voltage reference (or any voltage between 0 and +5 volts, to be digitized).
Set Up: Connect AtoD module cable to Control Board J6, if external AtoD module is used. Connect external +18v to Control Board. Measure the output of the AtoD's +5 volt regulator. Connect the printer port cable from the computer to the control board. Open Liberty Basic main program, then open atodtest.bas. (latest is rev.101). The Code Window will open. Change the values of the global variables, magadconv =, and phaadconv =. Input a value of 8, 12, or 16 depending on the type AtoD you have installed in each position.
Apply +2.5 volts to the Magnitude input of the AtoD. Apply +2.5 volts to the Phase input of the AtoD, if installed. You can tie the two inputs together and apply a single voltage to both. Click on "Run" (little blue man). A small window "Analog to Digital Converter Test" will open and begin "RUNNING", as seen in the box above the "RESTART" button. The top box "Magnitude Data" will read the decimal equivalent of the magnitude AtoD output. The second box "Phase Data" will read the decimal equivalent of the phase AtoD output. The value will be dependent on several factors: Type of AtoD, Voltage level at input to AtoD, and where the Adjustment pots are set (VR1, VR2). You should be able to adjust these pots and change the output value(s) in the window. You must stop the program before "exiting" the window. Just press any key on the computer keyboard.
For the 8 Bit AtoD and +2.5V input you should be able to adjust VR, about mid range, to get a value of 250. 255 is the maximum bit value of an 8 bit AtoD.
For the 12 Bit AtoD and +2.5V input you should be able to adjust VR, about mid range, to get a value of 4090. 4095 is the maximum bit value of a 12 bit AtoD.
For the 16 Bit AtoD and +2.5V input you should be able to adjust VR, about mid range, to get a value of 65000. 65535 is the maximum bit value of a 16 bit AtoD.
April 12, 2006 Add the following test software: commandAtoD12.bas . This test will open up a little window so that you can input a code, in bit values from 0 to 4095. It will command the 12 Bit AtoD's ladder latches, and retain the data in a static condition. This way, the builder can troubleshoot any problem on his 12 Bit AtoD board.
Log Detector Module
The Log Det Module does not require any direct commands from the computer, and it can be tested with only a voltmeter. If tested in conjuction with the AtoD Module, no voltmeter is needed.
This is a Log Det circuit using the MC3356 IC. It is my original design and works quite well. However, the MC3356 is not readily available.
Log Detector using MC3356 :
The following are Log Detector circuits designs utilizing two Log Det IC's from Analog Devices.
Log Detector using AD8307 :
Log Detector using AD8306 :
The AD8306 has similar characteristics as the AD8307, and it has a limited RF output. The limiter is not used in the MSA, but I chose this device so that I could use the MSA for experimenting as a Vector Network Analyzer.
To determine if the Log Det is wired correctly and is operational, just apply power to the module and measure the DC output of the Log Det. With no signal input, it should read from 200 to 300 mv. Touch your finger to the input pin (added ambient noise), and DC Video output should increase.
For full integrated testing, connect the Log Det to the AtoD Converter, and the AtoD Converter to the Control Board. Open and Run atodtest.bas. The Bit Value in the "Analog to Digital Converter Test" Window will indicate the output of the Log Detector. The actual value will depend on several factors. They are, type of Log Detector, type of AtoD, Voltage level at input to AtoD (Log Det out), and where the Adjustment pots are set (VR1, VR2 on AtoD Module).
With a known RF signal on the input, the Log Det can be characterized. You need an RF source (CW) at the frequency the Log Det is going to be used at, (Final I.F. frequency of the MSA), nominally 10.7 MHz. The power level should be adjustable from +10 dBm to -100 dBm. A 50 ohm selectable attenuator is optimum and should be placed directly on the input to the Log Det. This will minimize input noise when the RF signal is very low. Connect a voltmeter to the output of the Log Det. Apply power to Module, but don't apply any RF to the attenuator. Set attenuator to about 50 dB of attenuation. Measure the Log Det output, and write it down. This is the noise floor of the Log Det. Apply -10 dBm to the Log Det. Write down it's output measurement. Increase the attenuation by 10 dB for an input signal to the Log Det to be -20 dBm. Write down it's output measurement. Continue this process until the Log Det output becomes equal to the noise floor. This is the minimum RF input the Log Det can measure (max sensitivity). Now, input -10 dBm again and decrease the attenuation in steps, to increase the RF input to the Log Det. You should be able to find the compression point of the Log Detector. The actual level will depend on the actual circuit design of the Log Detector. For the MC3356, the level is about 0 dBm. For the AD8306/8307, it is about +10 dBm. In any case, this is the maximum input to the Log Detector, and the only measurement that is important in the design and calibration of the MSA. It is important to say that the Log Detectors maintain their best accuracy when operated in the range of 10 dB below compression, and 10 db above the maximum sensitiviy. For the MC3356, this range is about -10 dBm down to -80 dBm.
If you are integrating the Log Detector, AtoD and Control Board at this time, you can calibrate and set the Adjustment pots in the AtoD Module. With this maximum RF input to the Log Det, adjust VR1 (or VR2) for maximum bit value being shown in the "Analog to Digital Converter Test" Window. For an 8 Bit, adjust for 254 or 255. For a 12 bit, adjust for 4094 or 4095. For the 16 bit, adjust for 65534 or 65535. These are the maximum AtoD values, so care should be taken in adjustment. Once the max value is reached (255, 4095, or 65535) further adjustment will not change the bit value. I suggest adjusting the pot(s) for 1 bit less than max value, when the maximum RF input is input to the Log Det. Write down this RF power level and call it "maxpower". Write down the bit value as "maxbits". These will be used later as a calibration value. Decrease the RF input signal into the Log Det by increasing the attenuator by 10 dB. Write down the bit value displayed in the Window as the value for "minus10bits". Increase the attenuator another 10 dB and write down the bit value displayed in the Window as the value for "minus20bits". Repeat these steps for all steps down to "minus130bits". It is likely that the bit values will duplicate from -100 dB to -130 dB. If so, just use the same bit values for the duplicating steps.
Master Oscillator Module
The Master Oscillator cannot be very well evaluated without a frequency counter and oscilloscope. If you don't have the test equipment, don't worry. Just test and verify that the voltage regulator is working properly. The output of the Master Oscillator can be verified when it is connected while testing the next module, the DDS Module.
This Master Oscillator Module is designed for maximum utility. The oscillator is buffered with a 74AC04 and has 3 outputs. Each output will drive a 50 ohm load, but I suggest the load be capacitively coupled to reduce power consumption in the buffer. If any output is not used, leave it open.
The oscillator will push in frequency with a minor change of Vcc. The voltage regulator is biased with the 50 ohm resistor and its output will be approximately 5.3 volts. Construct the module with R1 in place, but with a small shorting wire across R1. Adjust VR 1 for minimum resistance and check the frequency. If you can adjust VR 1 to bring the frequency to exactly 64 MHz, leave the short on R1. If not, open the short and adjust VR1 for exact frequency. For example, one of my tests showed that the 5v reg. was outputting 5.11 volts with the short. The osc was at 64.000697 MHz. Adjusting VR 1 for 5.01 volts on the MXO oscillator gave exactly 64.000000 MHz. If the builder is not planning to add the optional Tracking Generator, the Master Oscillator Frequency does not need to be adjusted. The software will allow frequency intolerance.
I have found that when the module is totally enclosed, the frequency becomes quite stable after about 5 minutes. However, with the module open, any air currents will cause temperature changes on the MXO oscillator, and cause frequency shifts.
Note that, if the R1 is left in circuit, the tab of the voltage regulator is NOT at ground potential and must be isolated from ground.
DDS Module
DDS using AD9850 :
The DDS Module can also be tested when integrated with the Control Board and Master Oscillator Module. Only a voltmeter is required for evaluation. Power up the Control Board with the Master Oscillator Module and DDS Module connected. Verify the DDS's 5v regulator is correct. Open ddstest.bas . The code window will open and show two global variables, "ddsclock" and "ddsoutput". Change the values of these variables to your requirements. The "ddsclock" is preset to "64" (64 MHz Master Clock frequency). The "ddsoutput" is preset to ".0000001". This is 0.1 Hertz. Click on "RUN" in the code window (or little blue man). The program will run and command the DDS to output a frequency of .1 Hz. Measure the voltage on the DDS Module at R4 or R5. This point is in between the output of the DDS chip and the output coupling capacitor. The voltmeter will read a changing voltage of 0 volts to about .5 volts, every 10 seconds. This will verify the output of the DDS module and will also verify that the Master Oscillator is running.
Change "ddsoutput" value to .000060 (60 Hz). Measure the DDS Module output connector(s) with the voltmeter's AC function. You should measure about 185 millivolts rms.
VCO Module
The VCO Module is not easily tested independently. Most home builders do not have high frequency test equipment. Therefore, I propose the builder construct both the VCO and PLL Module and test them together. The VCO Module requires a power source of +15v at 80 ma.
PLL Module
The PLL Modules come in several configurations, but all can be tested in the same manner and with the same software.
PLL 1 style, using LMX 2326 or ADF 4112:
The PLL 1 style Module requires 3 voltage sources: +20 v at 5 ma, +15 v at 20 ma, and -5 v at 5 ma.
PLL 2 / 3 style, using LMX 2326 or ADF 4112:
The PLL 2 type requires only the +15v source. These designs can be modified by replacing the PLL IC's with other types. These modules have also been built with the LMX2325, LMX2350, and LMX2353. All perform very well.
VCO/PLL Module Combination
Modules required for testing: Control Board, Master Oscillator, VCO, and PLL. The only test equipment required is the voltmeter to verify operation. Connect the VCO Module's Reference Output (P1 or P2) to the PLL Module's VCO Reference Input (P2). Connect the PLL Module's Control Voltage Output (P1) to the VCO Module's Control Input (P3). Connect the output of the Master Oscillator (or other frequency source) to the PLL Module's Reference Input (P3). Connect the PLL Module's Control (P4) to the Control Board's J1 (or J2 or J3) connector. Apply needed voltage sources to Control Board (+24v, +18v, -8v). Open Liberty Basic and then open LMX2326test.bas or LMX2353test.bas . The code window will open. Change the Global variable values for your conditions.
These PLL tests are still in progress of being written, and have not been thoroughly tested. I am posting these two software routines for a few builders who want to "tinker".
Low Frequency Sweeper, with Display