The steps in using this
feature are: 1.Set
the video filter to Narrow (large
capacitor). (Both
the hardware video filter switch and the software Video Filter combobox must be set.) 2.Open
the Measure Components
Dialog. You do not have to perform any scan or make any particular
settings,
other than the video. 3.Select
the type of fixture
the DUT is to be mounted in, Series or Shunt. 4.Enter
the impedance (R0) of
the fixture, generally 50 ohms. 5.Select
the component type. 6.For
the Series Fixture
attach a Short—i.e. a direct, low impedance connection between the
terminals of
the fixture. A brass strip is frequently a good choice. For the Shunt
Fixture,
calibration is done with an Open, which in this case means simply
attaching
nothing to the fixture. 7.Click
Calibrate. The MSA
will perform a very quick calibration at 9 frequencies from 100 kHz to
40 MHz. 8.Remove
the Short (if
attached) and attach the DUT. Click Measure. The MSA will repeatedly
measure
the component and update the display. During the measuring process, the
label
of the Measure button changes to Stop. 9.Remove
the component and
attach other components, as desired. 10.When
done, click Stop.
Measurement will stop at the end of the current 9-point sweep. 11.If
desired, click the –Freq
or +Freq buttons to show the measurement at other frequencies. 12.When finished, click Done. Measurements
are made at 9 frequencies, and the MSA chooses to display the one that
seems to
be at the best frequency for that value component. It is possible for
the
measurement frequency to be as low as 100 kHz. At such low frequencies,
there
may be components in the TG signal near the first IF frequency of the
MSA that
can distort measurements. Therefore, it is a good idea to place a low
pass
filter on the TG output or the MSA input. The highest measurement
frequency is
40 MHz, so the filter should have a corner frequency anywhere from 50
MHz to
900 MHz, and should attenuate signals in the 1000-1100 MHz range by at
least 30
dB. Below
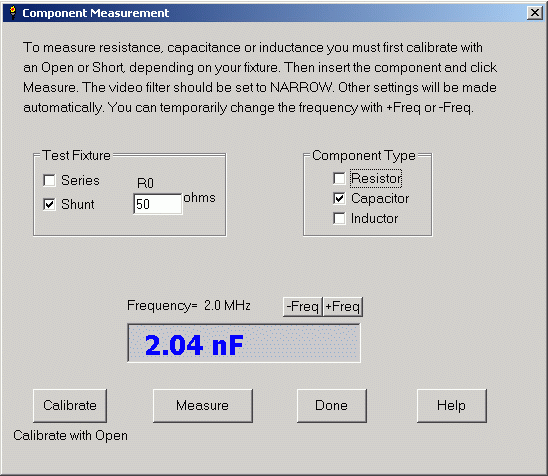
is an image of the Component Measurement dialog, measuring a 2006 pF capacitor (per AADE meter).
Measurement
accuracy seems to be 2% or better--frequently better than 1%--over a
broad
range. For a fairly crude Series Fixture, which should be best for
higher
impedances, that range is about 5 ohms to 100 kohms;
for capacitors, 20 pF to 0.1 uF,
and for inductors 150 nH
to at
least 1 mH. A more precise shunt fixture,
which
should be better for low impedances, had a range for resistors from 3
ohms to 1
kohm (and was respectable below 1 ohm); for
capacitors, 15 pF to 1 uF;
and for inductors 100 nH to at least 1 mH. Both fixtures could measure much smaller
components if
the accuracy standard is loosened to 10%. Smaller components can also
be
measured much more accurately if they are soldered directly onto the
test
fixture, rather than attached to a connector.
Very
large inductors with ferrite or iron cores may not be measured
accurately if
their losses are too high at the measurement frequency. Furthermore,
such
inductors may have parasitic capacitance high enough to create a
self-resonant
frequency low enough to interfere with measurement. One such inductor
actually
had a resonant frequency lower than 100 kHz, the lowest measurement
frequency,
and therefore appeared to the MSA to be a capacitor rather than an
inductor.
Inductors
with large losses, or any components whose self-resonant frequency
interferes
with measurement, are better handled by the RLC analysis available in
Reflection mode.