Feb 9, 2010 Page released. The MSA as a
Crystal Analyzer Two
versions of the MSA will function as a Crystal Analyzer. The MSA
with Tracking Generator (build level 2, also referred to as the SNA),
and the MSA with Tracking Generator and VNA extension (build level 3, also referred to as the
VNA). Both will peform with the same accuracy but the procedures
are a little different.
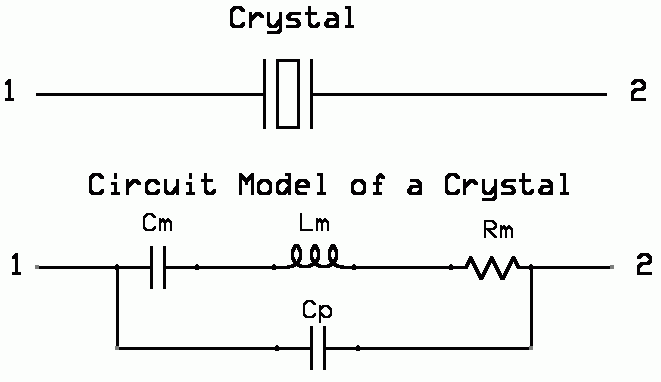
Crystal Basics A
crystal is an electro-mechanical device that can be modeled like the
circuit below:
In reality, Cm, Lm, and Rm do not exist within a
crystal. However, a crystal "acts" like it has these components
because of its electro-mechanical (piezo) nature. These are
"motional" (m) characteristics. You may see these modeled
components called Cs, Ls, and Rs (series). The component, Cp is
quite real. It is the parallel interelectrode capacitance of the
mechanical connections to the crystal blank within the crystal
case. In most crystals, Cp is less than 10 pfd, and can be as low
as 1 pfd, or less.
These motional characteristics are important when using
crystals as filters. Obtaining crystal characteristics using
manual or semi-automatic software techniques have been written and
published for many years. The MSA/TG (SNA) or MSA/TG/VNA (VNA)
can
derive these characteristics with very good accuracy. The only
required accessory for the MSA is a Series Test Fixture (and in some
cases, even that is not necessary).
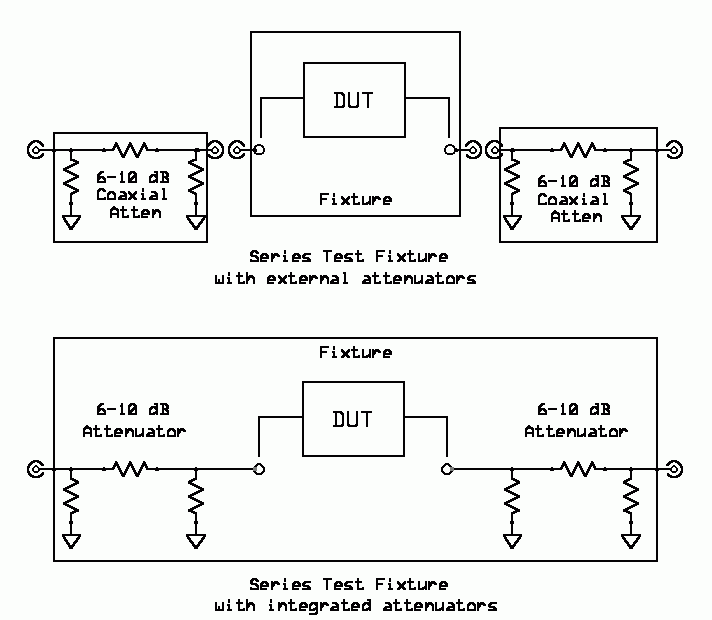
Serial Test Fixtures
The external coaxial attenuators are assumed to be
50 ohms. The
internally integrated attenuators can be 50 ohms or they can be a
impedance transformation circuits (R0 to 50 ohms) to match to the 50 ohms
impedance of the MSA. Some builders prefer to use an R0 of 12.5 ohms when testing
crystals. The DUT is the crystal under test.
If you are testing crystals with very long leads,
the Series Test Fixture could be eliminated. The crystal is
simply placed between the MSA Tracking Generator output and the MSA
Input. Although the results will be less than "great", this
method can be used for matching sets of crystals.
Serial Test Fixture with integrated attenuators.
Serial Test Fixture requiring external coaxial attenuators. Testing Crystals with an SNA or VNA If
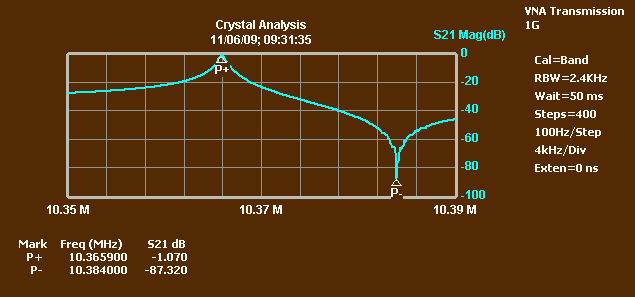
a crystal is placed in a Series Fixture, a VNA (or SNA) sweep will show
a peak at
its series resonant frequency (Fs), and a dip at its parallel resonant
frequency (Fp). These frequencies are
marked in the
following scan by the P+ and P- markers. For meaningful
results, a line calibration must have been performed. The MSA
has been "line calibrated" with the Series Test Fixture to display the following
results.
Plot 1 This
scan of a series crystal (Plot 1) contains all the information needed
to calculate motional parameters. Data collected are series
resonant frequency (Fs, displayed as P+), parallel
resonant frequency (Fp, displayed as P-), and the 3 dB points of
the response (although not displayed). Fs is the series resonant frequency of the
crystal,
for which
accuracy is most important to derive motional characteristics of a
crystal. It would seem that the
resolution of 100 Hz/step
is not
enough to pin down Fs very precisely. However, the VNA uses phase
measurements, and are used to locate Fs quite
precisely. Phase is so linear near Fs that the
interpolation works very well. Since the SNA does not use Phase
information, we need better resolution to abtain results that are
equivalent to the VNA. The scan could be
re-run with
higher
resolution, which would make it very slow, or we could simply record
the value
of Fp (P-) and zoom in on the area around
Fs (P+),
as shown
below:
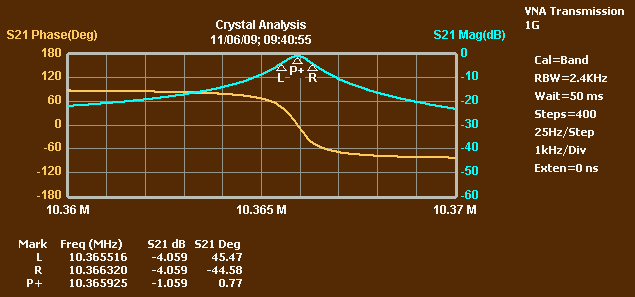
Plot 2 The
above graph shows the area around Fs with enough resolution to
determine its series resonant frequency fairly well, though a narrower
scan would be better. For extreme accuracy, the scan should
provide a resolution of 5 Hz/Step or less. Markers can be
automatically placed by clicking the menu item, Functions / Filter
Analysis. Once this
scan in place we click the
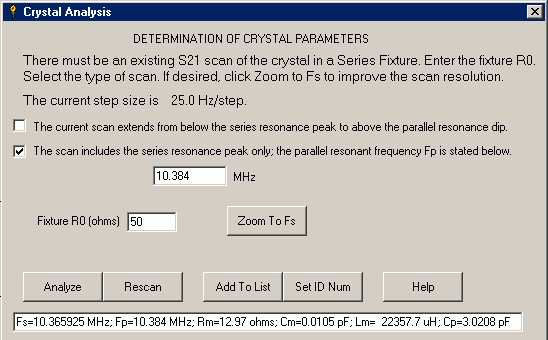
menu item, Functions / Crystal Analysis, to access the Crystal Analysis dialog window. The Crystal Analysis dialog window
allows us to indicate whether, or not, the scan includes the dip at Fp. Plot 2 does not. If not, Fp is specified, which we obtained from the
broad
scan (Plot 1, P-). It also allows us to specify the R0 of
the fixture.
Most
fixtures associated with the MSA will have R0 of 50 ohms,
but in
the
case of crystals, some users may prefer using a fixture with R0
of 12.5 ohms.
Here,
though, we use a 50-ohm fixture. Clicking the "Analyze" button
causes the MSA to place the markers (shown in Plot 2),
calculate the crystal parameters, and display the parameters in the
long box at
the bottom of the
dialog. If
testing just one crystal, we can write these values down. However, if
we are
testing a batch of crystals we can click Add To
List,
and the MSA will display a new window with the test results for this
crystal and
every other one we have added to the list. The crystals will be
numbered
sequentially in the list. In case we want to delete some entries from
the list
and back up the numbering a bit, we can click Set ID Num to specify the
ID
number for the current crystal. To repeat a sweep, click
Rescan.
The Zoom button will automatically command the MSA
to sweep between the 3 dB points of Fs (P+). One feature of
"Zoom" is that you can zoom twice. If the current resolution is
less
than 100 Hz, then Zoom aims for 15 Hz resolution. If Zoom starts with
resolution of 100 Hz or better, it aims for 5 Hz resolution. But it
never uses fewer than 50 or more than 400 steps. Note: If
using
Zoom and then Rescan, the checkboxes will get set to "sweep contains Fs
and Fp" during Rescan. To repeat the Zoom feature, the "Zoom" button
must be clicked.
Before clicking the "Analyze"
button, to calculate the crystal parameters, you
should verify that optimum conditions are met. You will want the
previous scan to have as "fine" a resolution as possible (Hz per step)
and that the MSA line calibration was current for that scan.
(a)
You can create a fine resolution scan
extending from below Fs to above Fp, with enough resolution to identify
Fs with the desired accuracy. For example, if you want +/-20 Hz
accuracy, you could select a
number of steps that makes the step size 20 Hz or less. The required
number of steps for this method is typically large, which can make
the scan extremely slow. Using the 40 KHz sweep
example of Plot 1, the number of steps required for a resolution of 20
Hz per step would be 2000 steps. One sweep would take well over 1
hour to complete. Using an SNA, this is the only way to have high
resolution for a wide band sweep. However, if your
MSA measures phase
(Build Level 3), Crystal Analysis will use the phase information to
locate Fs by interpolation between adjacent points, which means good
accuracy can be obtained with a coarse
(fast) scan. In the same example, a 40 KHz sweep with 400 steps
would result in a resolution of 100 Hz per step. The calculations
would use the phase interpolation of the VNA, and
would be sufficient for obtaining Fs with good accuracy.
(b)
You may do a coarse sweep that
includes Fs and Fp (as in Plot 1), and rely on the Zoom to Fs
feature of Crystal Analysis to get a more
precise scan of Fs. As an example, you could perform the coarse scan
with 400 steps per sweep and then the "Zoom" would perform an automatic
scan between the 3 dB points of Fs.
(c)
You may record Fp from the scan (P-, in Plot 1) and then change the
scan for a finer resolution
focused around Fs (including its
-3 dB points), using a step size small enough to identify Fs
precisely. This will be a narrow scan,
so a small step size can probably be achieved with fewer steps.
For example, the finer resolution scan from Plot 1 could be from 10.364
MHz to 10.368 MHz. With 400 steps, the sweep would have a resolution of
10 Hz per step. This is the method I prefer when testing a large
batch of same type crystals.
Suggested Procedure for measuring the
motional parameters of a crystal
1. Set-Up
a. Attach the Serial
Test Fixture
between the MSA Tracking Generator output and the MSA input.
b. Install the Crystal in the Serial Test Fixture. HINT: If the
crystal is soldered into the test fixture, allow the crystal to
stabilize to the ambient room temperature. When matching
crystals, it is imperative that each crystal test be at exactly the
same temperature. Fs, the Series Resonant Frequency can change
several Hz per degrees C. c. Enter the VNA
Transmission Mode or the SNA Mode (for MSA/TG). d. Set the video
filter
to
Narrow (large
capacitor) and the wait time to at least "50". (Both the hardware
video filter
switch and the software Video Filter combobox
must be
set.) 2. Coarse Sweep
a. Identify the
frequency
range
necessary to show both Fs and Fp. You can
actually do
this without a line calibration, because the peaks are so strong.
b. Run an
initial sweep and then Halt, to obtain a plot that is similar to the
above
screen shot, "Plot 1". "Similar" meaning a sweep wide enough to
show the Series Resonant Frequency and the Parallel Resonant Frequency
(as indicated by the markers, P+ and P- in Plot 1). Ampltude and
Phase
characteristics are not important. They will be correct after the
line calibration. You can change the Magnitude Scale to display
the low level of the Parallel Resonant Frequency.
c. Click Menu item, Functions/Crystal Analysis.
d. The Crystal Analysis Window will open.
e. Enter a different Test Fixture crystal load circuit if it is not 50
ohms.
f. Click the "Analyze" button. g. The
crystal
parameters
will be calculated and placed in the box at the bottom of the
dialog. If a line calibration has not been performed, the
motional values will be in error. However, Fs and Fp will be
quite accurate.
h. If VNA is used, skip to the next section of the procedure and
perform a line calibration. If the SNA is used, or if you want ultimate
performance from the VNA, continue with the next step. i. Write down the
value of P-, which is the parallel resonant
frequency, Fp.
j. Scan with a narrower sweep to include only the range of frequencies
just outside the
3 dB points of P+ (the crystal's Fs). Using Plot 2 as an example,
the sweep range could be from 10.365 to 10.367 MHz. Using 400
steps, this would sweep with a resolution of 5 Hz per step.
k. Halt the sweep.
3. Line Calibration
For best performance, the MSA must be "line calibrated" before sweeping
a crystal under test. This will ensure that the Serial Test
Fixture and extension cables will not have any effect on the final
crystal calculations. There are two types of line calibrations
that can be performed, the Baseline Calibration and the Band Sweep
Calibration. Normally, a Baseline Calibration for the MSA will
cover the total frequency range for which the MSA is in, i.e., 0 to
1000 MHz. A Band
Sweep Calibration will cover only the frequencies that are to be used
in the current sweep, which would be the frequency range that was
chosen in step 2.j. The Band Sweep Calibration will provide the
best results for crystal analysis. This is the procedure: a. Short out the crystal
with a short wire. Or, remove the crystal and
replace with a short.
b. Click Menu item, Operating
Cal/Perform Cal. The Perform Calibration Window will open.
c. Click
Perform Band Cal. The MSA will enter a single sweep cycle and
halt.
d. Click Done. e. This Line
Calibration
will be good for all subsequent sweeps as long as the sweep frequency
range is not changed. On the next sweep, the MSA will
automatically select the Band Cal as its reference.
f. HINT: I always run test sweeps after performing any Line Calibration
to assure that everything is repeatable. Do so by clicking "Restart".
The Magnitude should indicate 0.00 dB +/- .1 db. For VNA, the
Phase should indicate 0.0 degrees +/- 1 degree. Move the Test Fixture
and extension cables around. During movement, expect to see the Phase
change a little. It should return to 0.0 when you stop the
Fixture/Cable movement.
4. Fine Sweep a. Remove short
from
crystal, or re-insert crystal into the Test Fixture.
b. Click "Restart". The Graph Window parameters will
change from Cal = None, to Cal = Band. The resulting sweep will
look similar to "Plot 2". You may use a large
number
of steps in order to get the step size in the 5-50 Hz range, so the MSA
can
determine Fs precisely. c. Click
Halt At End. d. Click Menu
item,
Functions/Crystal Analysis.
e. The Crystal Analysis Window will open.
f. Enter a different Test Fixture crystal load circuit if it is not 50
ohms.
g. Check "The scan includes the series resonance peak
only....".
h. Enter the value of P-, that you recorded earlier.
i. Click the "Analyze" button. j. The
crystal
parameters
will be calculated and placed in the box at the bottom of the dialog. 5. Create a list of
crystals.
If you want to create
a
list of
tested crystals, click Add To List. The
list will be
in a normal text window where you can delete entries or make any other
changes,
and you can copy the data to the clipboard or save it to a file. Each
crystal
is numbered in the list; if you need to change the current number,
click Set ID
Num. 6. Testing multiple
crystals of the same type.
a. Remove the current crystal under test and replace it with a new
one. HINT: I suggest using tweezers to handle the crystals, so as
not to change their temperature by the heat in your fingers. Yes, just
a few seconds of handling will change a crystal temperature several
degrees (and many Hertz).
b. Click "Rescan" to obtain a new trace with new data for analysis. The
current line calibration is still in effect. c. A single sweep will
be initiated and will automatically Halt at End. d. Click the
"Analyze" button. e. The
new crystal
parameters
will be calculated and displayed in the box at the bottom of the dialog.
f. You may add this crystal's parameters to the list or write down the
data for future reference. g. When finished
with a series of crystals,
click the Close Box at the upper right of the dialog. If you created a
crystal
list, the list window will remain open until you close it.